Hello, friends! Today I'm popping in here with a couple of slimline cards featuring my very favorite go-to background technique when I want an amazing background that works for almost any card! I borrowed these adorable Reverse Confetti Love Bugs from my friend, Amy Kolling, during a weekend crafty get together with friends! I love how these cards turned out.
Affiliate links are used throughout this post at no additional cost to you. This allows me to keep bringing you content. Thank you all for your support!
V I D E O T U T O R I A L
Watch the creation of these Love Bugs slimline cards from start to finish below or click HERE to watch in HD:
Images from the Reverse Confetti Love Bugs Stamp Set were stamped on smooth white cardstock with black ink and colored in with the following Copic Markers:
Below you will find links to the supplies used to create this project(s). Click the thumbnails to start shopping. Where available I use compensated affiliate links at no extra cost to you. Your support helps me to keep bringing you new projects and videos. Thank you!
Affiliate links are used throughout this post at no additional cost to you. This allows me to keep bringing you content. Thank you all for your support!
V I D E O T U T O R I A L
Watch the creation of these patterned paper inspired cards from start to finish below or click HERE to watch in HD:
A greeting from the Simon Says Stamp Simply Thank You Stamp Set was stamped along the bottom of the vellum with clear embossing ink and heat embossed with white embossing powder.
The card was finished with a scattering of heart embellishments.
S U P P L I E S
Below you will find links to the supplies used to create this project(s). Click the icon for the store underneath the thumbnails to start shopping. Where available I use compensated affiliate links at no extra cost to you. Your support helps me to keep bringing you new projects and videos. Thank you!
Happy weekend, friends! It's been a week. (Amiright?!) I never got around to posting last Friday's YouTube Live (January 14, 2022) so I thought I'd share it here today in case you missed it! Gnomes, mushroom homes, and Doodlebug patterned paper... can't go wrong with that combo!
Affiliate links are used throughout this post at no additional cost to you. By shopping with my links, you allow me to keep bringing you content. Thank you all for your support!
V I D E O T U T O R I A L
Watch the creation of this Valentines Dancin' Gnome from start to finish below or click HERE to watch in HD:
More supplies linked in the supply list at the bottom of this post
COPIC MARKER COLORS USED:
Beard: W1, W3
Nose: E11, E13
S U P P L I E S
Below you will find links to the supplies used to create this project(s). Click the icon for the store underneath the thumbnails to start shopping. Where available I use compensated affiliate links at no extra cost to you. Your support helps me to keep bringing you new projects and videos. Thank you!
Currently I am doing a Friday morning Lives at 9 am CT. Replays will be on my YouTube Channel.
I have a few requests to edit the Lives. Currently I am not going to edit them. This is for a couple of reasons:
1) Lives are new to me and we are going to stick with this format for a bit. I personally love Lives. I haven't watched an edited Live so I reserve the right to reconsider in the future if I think it's something I can fit in my schedule.
2) I don't want to spend the precious hours I have for creating new content, editing a Live. I will be bringing the exact same amount of traditional content and videos to my channel. Lives/replays are in addition to that content.
If you want to join us for some real-time crafty fun each week I would love to "see" you there. Please make sure to SUBSCRIBE to my YouTube Channel and click the notification bell so that YouTube alerts you when I'm going live. I am trying to reach 100,000 subscribers so if you haven't subscribed yet I would SO appreciate it! I am grateful for my community on all the platforms!
Thanks to everyone who joined me today! I had a blast visiting with everyone. ❤️
Welcome to the January 2022 Mama Elephant Release Blog Hop!
Today I am sharing two flat shaker cards featuring new stamps and dies from the January 2022 Release.
Affiliate links are used throughout this post at no additional cost to you. This allows me to keep bringing you content. Thank you all for your support!
V I D E O T U T O R I A L
Watch the creation of these flat shaker cards from start to finish below or click HERE to watch in HD:
More supplies linked in the supply list at the bottom of this post
The Mama Elephant Mod Hearts uneven frame and large mod heart were die cut from smooth white cardstock to make shaker frames.
Hero Arts Peony Cardstock was die cut with a Mama Elephant B2B Rectangles to fit behind the frame.The cardstock was wrapped with recycled stamp packaging on three sides, filled with shaker confetti, and sealed shut on the fourth side as shown in the video.
Below you will find links to the supplies used to create this project(s). Click the thumbnails to start shopping. Where available I use compensated affiliate links at no extra cost to you. Your support helps me to keep bringing you new projects and videos. Thank you!
It's an exciting day! The Simon Says Stamp Limited Edition Valentine's Kit is HERE!!! This kit is always highly anticipated and sells out quickly so if you're interested grab it quickly. I have a special video for you today - 10 cards with the kit - ALL featuring the pre-mades from the kit "dressed" up with stenciling, stamping, etc.
Affiliate links are used throughout this post at no additional cost to you. This allows me to keep bringing you content. Thank you all for your support!
V I D E O T U T O R I A L
Watch the creation of these ten cards from start to finish below or click HERE to watch in HD:
More supplies linked in the supply list at the bottom of this post
S U P P L I E S
Below you will find links to the supplies used to create this project(s). Click the icon for the store underneath the thumbnails to start shopping. Where available I use compensated affiliate links at no extra cost to you. Your support helps me to keep bringing you new projects and videos. Thank you!
Happy Monday and welcome to the January 2022 My Monthly Hero Blog Hop!
It's new release day! The Hero Arts January My Monthly Hero products are here and today I'm sharing a trio of cards featuring new Add Ons only stamps and dies from the release!
Affiliate links are used throughout this post at no additional cost to you. This allows me to keep bringing you content. Thank you all for your support!
V I D E O T U T O R I A L
Watch the creation of these Valentine's/love cards from start to finish below or click HERE to watch in HD:
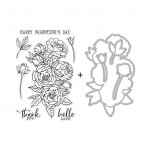
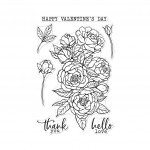
The flower image was adhered with foam adhesive along the bottom of the background panel. The excess was trimmed off and the remaining adhered along the top of the panel.
More supplies linked in the supply list at the bottom of this post
Hero Arts Reactive Ink in Pool Party was inked in the center of a 4 1/4" x 5 1/2" panel of smooth white cardstock. The background was spritzed with water from a Distress Sprayer. White Gouache was splattered on the background.
Images from the Hero Arts Flower Girl Stamp Set were stamped on smooth white cardstock with Hero Arts Intens-ified Black Ink and colored in with the following Copic Markers:
Girl in Red Dress: E13, E25, E27, BV20, W6, W7, W8, RV29, R46, RV02, RV06, RV09, E50, E55, E57
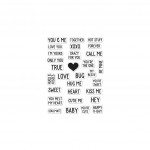
Greetings from the Hero Arts V-Day Mini Messages Stamp Set were stamped on the hearts and banner with clear embossing ink and heat embossed with white embossing powder.
The images were adhered to the background with foam adhesive.
The card was finished with a scattering of heart accents.
S U P P L I E S
Below you will find links to the supplies used to create this project(s). Click the thumbnails to start shopping. Where available I use compensated affiliate links at no extra cost to you. Your support helps me to keep bringing you new projects and videos. Thank you!
We will give away a $50 gift card, drawn from the comments left across the hop. Enter by Sunday, January 16th at 11:59pm Pacific, and the winner will be announced on the Hero Arts blog the following week.
Hello weekend! Love is in the air and there's a brand new @prettypinkposh Valentine's Day release now available! Today I'm sharing a couple of flat shaker cards featuring the brand new Love Hearts Die and greetings from the Valentine Wreath Stamp Set. With just a few color changes these products can go from Valentine's to another occasion so easily! And the best part? These are FLAT shakers! No bulky foam tape needed!
Affiliate links are used throughout this post at no additional cost to you. This allows me to keep bringing you content. Thank you all for your support!
V I D E O T U T O R I A L
Watch the creation of these flat shaker cards from start to finish below or click HERE to watch in HD:
More supplies linked in the supply list at the bottom of this post
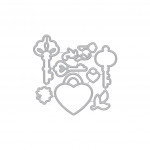
The Pretty Pink Posh Love Hearts was die cut from smooth white cardstock and colored the images with the following Copic Markers:
Red Flowers/Hearts: R30, R32, R35, R37
Leaves: G00, G02, G09
A scant 4 1/4" x 5 1/2" smooth white panel was inked with Pawsitively Saturated Inks in Cheeky, Blush, and Pucker. Leftover packaging was trimmed approximately 3/4" larger than the panel and secured on 3 sides, leaving one side open to fill with shaker bits. I filled this shaker with Hero Arts Icicle Glitter and Honey Bee Stamps Tiny Red Confetti Hearts. I sealed up the fourth side of the shaker and adhered the frame to the flat shaker as shown.
A sentiment from the Pretty Pink Posh Valentine Wreath Stamp Set was stamped on one of the hearts with clear embossing ink and heat embossed with white embossing powder. Another greeting from the stamp set was stamped on smooth white cardstock with Pucker Ink, die cut with the coordinating Pretty Pink Posh Valentine Wreath Die, and adhered to the other heart as shown.
The design was finished with Nuvo Crystal Drops in Glossy White in the flower centers and some Lucy's Little Things Hearts Droplets in Coral and Poppy.
More supplies linked in the supply list at the bottom of this post
The Pretty Pink Posh Love Hearts was die cut from smooth white cardstock and colored the images with the following Copic Markers:
Purple Flowers/Hearts: BV31, BV34, BV39
Leaves: BG90, BG93, BG96
A scant 4 1/4" x 5 1/2" smooth white panel was inked with Simon Says Stamp Dusty Sage and Seafoam Dye Inks.. Leftover packaging was trimmed approximately 3/4" larger than the panel and secured on 3 sides, leaving one side open to fill with shaker bits. I filled this shaker with Hero Arts Icicle Glitter and Lucy's Little Things Sprinkles Hearts in Purple. I sealed up the fourth side of the shaker and adhered the frame to the flat shaker as shown.
The design was finished with Nuvo Crystal Drops in Silver Lining in the flower centers and some Lucy's Little Things Hearts Droplets in Lilac.
S U P P L I E S
Below you will find links to the supplies used to create this project(s). Click the icon for the store underneath the thumbnails to start shopping. Where available I use compensated affiliate links at no extra cost to you. Your support helps me to keep bringing you new projects and videos. Thank you!
Happy Wednesday, friends ! I don't know about you but I am all about a new Distress Color! The brand new Kitsch Flamingo is gorgeous and is the perfect addition to the Distress color family! I often find it hard to really "see" how the color differs from previous colors so a good swatching always helps showcase how the newest colors fit into the line up. I posted the comparison photo (shown below) on my Instagram a few days ago and I've received quite a few requests for more of these types of comparisons in additional colors. If you want to see more Distress Ink swatch color comparisons please let me know! My cards today also feature an assortment of currently on sale Simon Says Stamp products! The stamps, dies, and stencils used are deeply discounted! Yay! Keep reading and/or watch the video tutorial for all the details.
Affiliate links are used throughout this post at no additional cost to you. This allows me to keep bringing you content. Thank you all for your support!
V I D E O T U T O R I A L
Watch the creation of these cards from start to finish below or click HERE to watch in HD:
Here is my comparison chart of my favorite Distress Oxide Ink colors for Valentine's Day:
A "thank you" greeting from the Simon Says Stamp Thankful Flowers Stamp Set was stamped on the Kitsch Flamingo heart (after drying time so that the embossing powder wouldn't stick to the entire heart) with clear embossing ink and heat embossed with white embossing powder.
A splattering of Tim Holtz Picket Fence Distress Paint was applied over the panel for a bit of subtle distressing. The panel was adhered to a 3 1/2" x 8 1/2" white slimline card base.
The hearts were adhered to the background as shown with the Kitsch Flamingo being adhered on top with foam adhesive.
Distress Oxide ink colors were applied to a scrap of smooth white cardstock and die cut with the Simon Says Stamp Hearts and Stars Wafer Die. Hearts were scattered throughout the card and finished with a layer of Glossy Accents.
A "You couldn't be more awesome" greeting from the Simon Says Stamp Thankful Flowers Stamp Set was stamped on the Spun Sugar layer (after drying time so that the embossing powder wouldn't stick to the entire heart) with clear embossing ink and heat embossed with white embossing powder.
The Distress Sprayer was used to add distressing to the panels. A splattering of Tim Holtz Picket Fence Distress Paint was applied over the panel for a bit of subtle distressing.
The panels were adhered to a 3 1/8" x 6 1/4" white slimline card base.
The leftover mini hearts from the first card were adhered to the card and finished with a layer of Glossy Accents to finish the card.
S U P P L I E S
Below you will find links to the supplies used to create this project(s). Click the icon for the store underneath the thumbnails to start shopping. Where available I use compensated affiliate links at no extra cost to you. Your support helps me to keep bringing you new projects and videos. Thank you!
Hello friends! Today I have three masking stencils Valentine's cards featuring mostly one-layer gnomes stenciled cards designs! The Gnomes Stencil, A2 Masks Stencils, Slimline Stencils, and an assortment of hearts stencils were used to create these happy Valentine's. In addition, the brand new Kitsch Flamingo Distress Ink is the perfect bright, happy pink color for the backgrounds and the Kitsch Flamingo Distress Glaze was used to heat emboss the bigger sentiments! Keep reading and/or watch the video tutorial for all the details.
Affiliate links are used throughout this post at no additional cost to you. This allows me to keep bringing you content. Thank you all for your support!
V I D E O T U T O R I A L
Watch the creation of these cards from start to finish below or click HERE to watch in HD:
More supplies linked in the supply list at the bottom of this post
The Simon Says Stamp Gnomes Stencil was lightly penciled on a 4 1/4" x 5 1/2" smooth white background to gauge how the gnome will fit within the mask. The pencil lines were erased and the gnome nose was inked with Lawn Fawn Apricot Ink. A mask was traced on Masking Paper, fussy cut and placed over the nose. The beard was shaded with Copic Markers in W1 and W3. The beard was traced on Masking Paper, fussy cut and placed over the beard. The hat was inked with Candied Apple Distress Ink. The hat was traced on Masking Paper, fussy cut and placed over the hat. The body of the gnome was inked with Spun Sugar Distress Ink. The polka dots were inked with Candied Apple Distress Ink. The body was traced on Masking Paper, fussy cut and placed over the body.
Below you will find links to the supplies used to create this project(s). Click the icon for the store underneath the thumbnails to start shopping. Where available I use compensated affiliate links at no extra cost to you. Your support helps me to keep bringing you new projects and videos. Thank you!
Happy Sunday friends! Today I am back with another idea for my 2021 Handmade Hearts & Things Series. A few months ago I shared THIS tutorial on creating seasonal gnome-themed die cut slimline cards with a promise to share ideas for each month. I know I skipped January (we'll get to her this next week. Promise.) I felt inspired to create this love-themed card for my series so I just went with it! Almost all the patterned paper is from the Simple Stories Sweet Talk 6" x 8" Patterned Paper (from the February 2021 SSS Card Kit or available separately). Keep reading and/or watch the video tutorial for all the details.
Affiliate links are used throughout this post at no additional cost to you. This allows me to keep bringing you content. Thank you all for your support!
V I D E O T U T O R I A L
Watch the creation of this Valentine Gnome Slimline card from start to finish below or click HERE to watch in HD:
The "love you" from the Simon Says Stamp Heart Animals Stamp & Die Set was die cut from a red patterned paper and brown patterned paper, and adhered one on top of another slightly offset for a subtle shadow. Glossy Accents was applied to the greeting as shown. Additional phrases from the stamp set were stamped above and below the die cut greeting with Simon Says Stamp Rose Apple Ink.
The gnomes were adhered to the scene as shown. Heart accents were scattered throughout the card to finish the design.
Even though the mushroom house and gnome hat stick up above the card, this slimline design fits in the Cotton Candy Slimline Envelope.
S U P P L I E S
Below you will find links to the supplies used to create this project(s). Click the icon for the store underneath the thumbnails to start shopping. Where available I use compensated affiliate links at no extra cost to you. Your support helps me to keep bringing you new projects and videos. Thank you!